Features
Learn how to use Private Transcriber AI
Getting Started
Initial Setup
After installing the app, the transcription model is immediately available. The LLM model can be downloaded separately by clicking the download button:
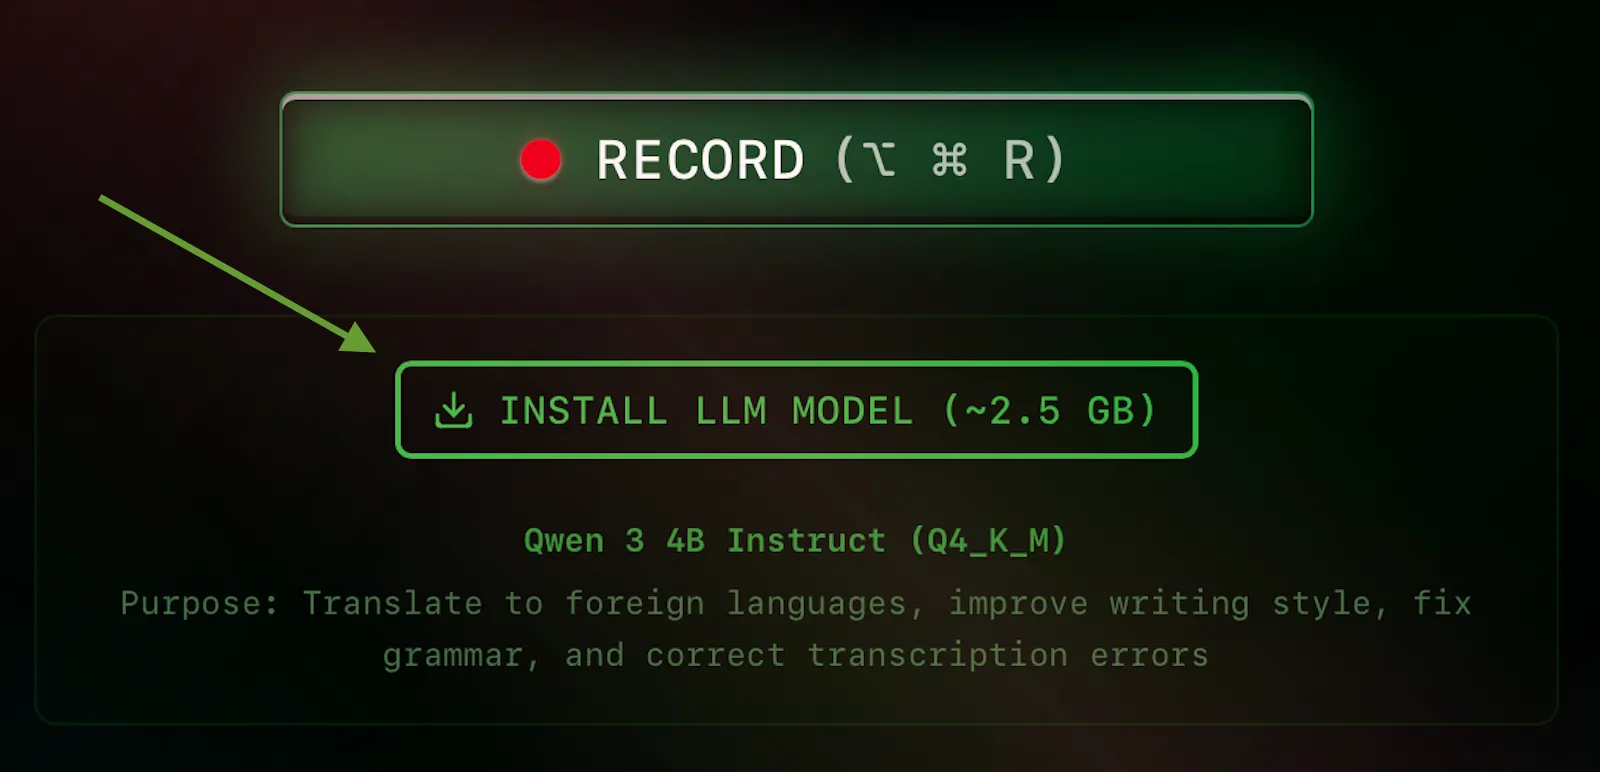
LLM Model Features: The LLM model is used for text correction, style formatting, and translation to various languages. It's optional but recommended for enhanced transcription quality.
During download, you'll see a progress indicator. You can continue using the app's transcription features while the model downloads:
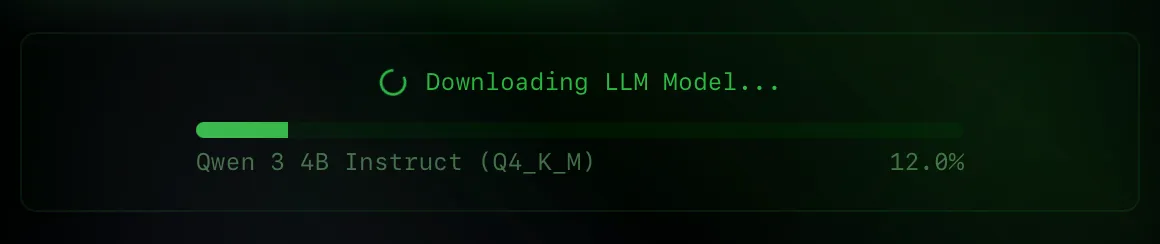
Background download: The app remains fully functional during download. Once the model is downloaded, LLM features will become immediately available without restarting the app.
Recording Process
Start Recording
To start recording your voice, click the RECORD button or use the keyboard shortcut:
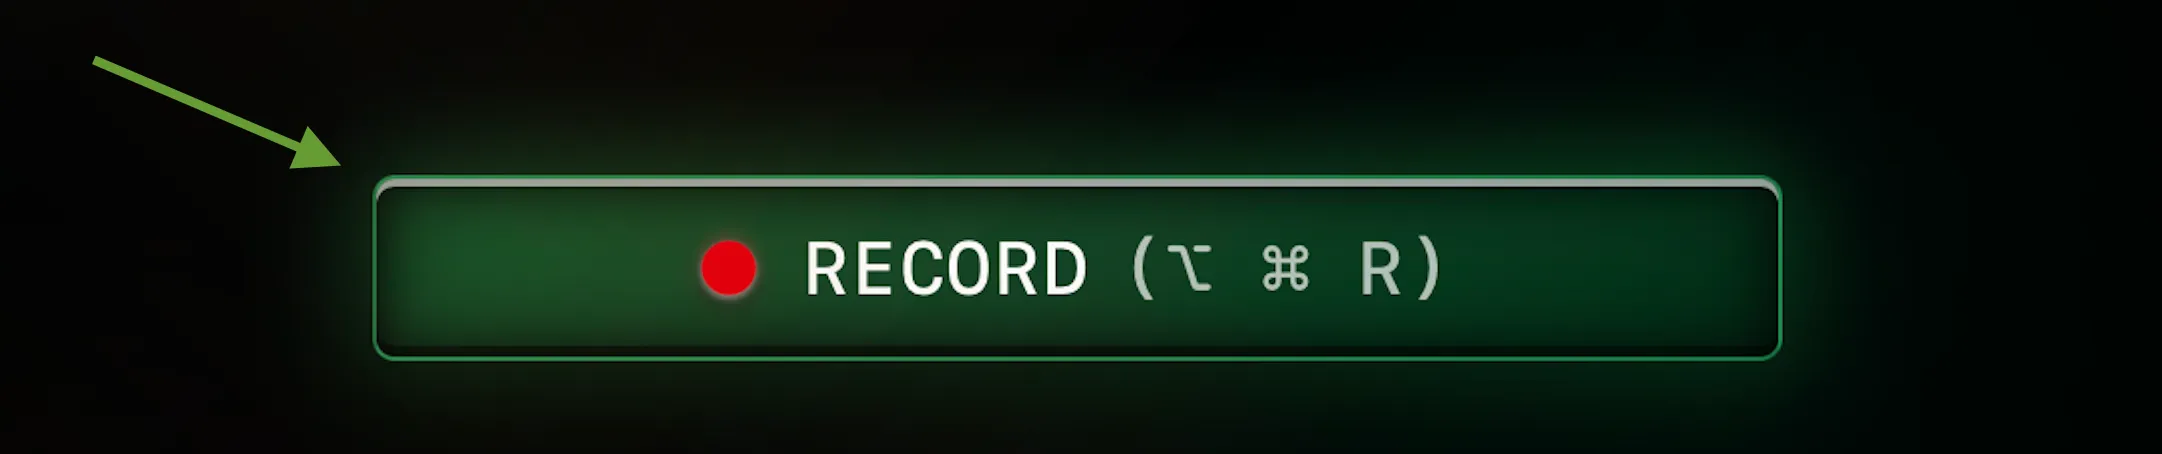
Default Hotkey: Option + Command + R (⌥ ⌘ R)
You can customize the hotkey by clicking the settings button in the top right corner of the app.
Microphone Access: The app requires microphone permission to record audio. Grant access when prompted by the system.
Audio Level Visualization
During recording, you'll see a real-time audio level indicator that helps you monitor the input signal:
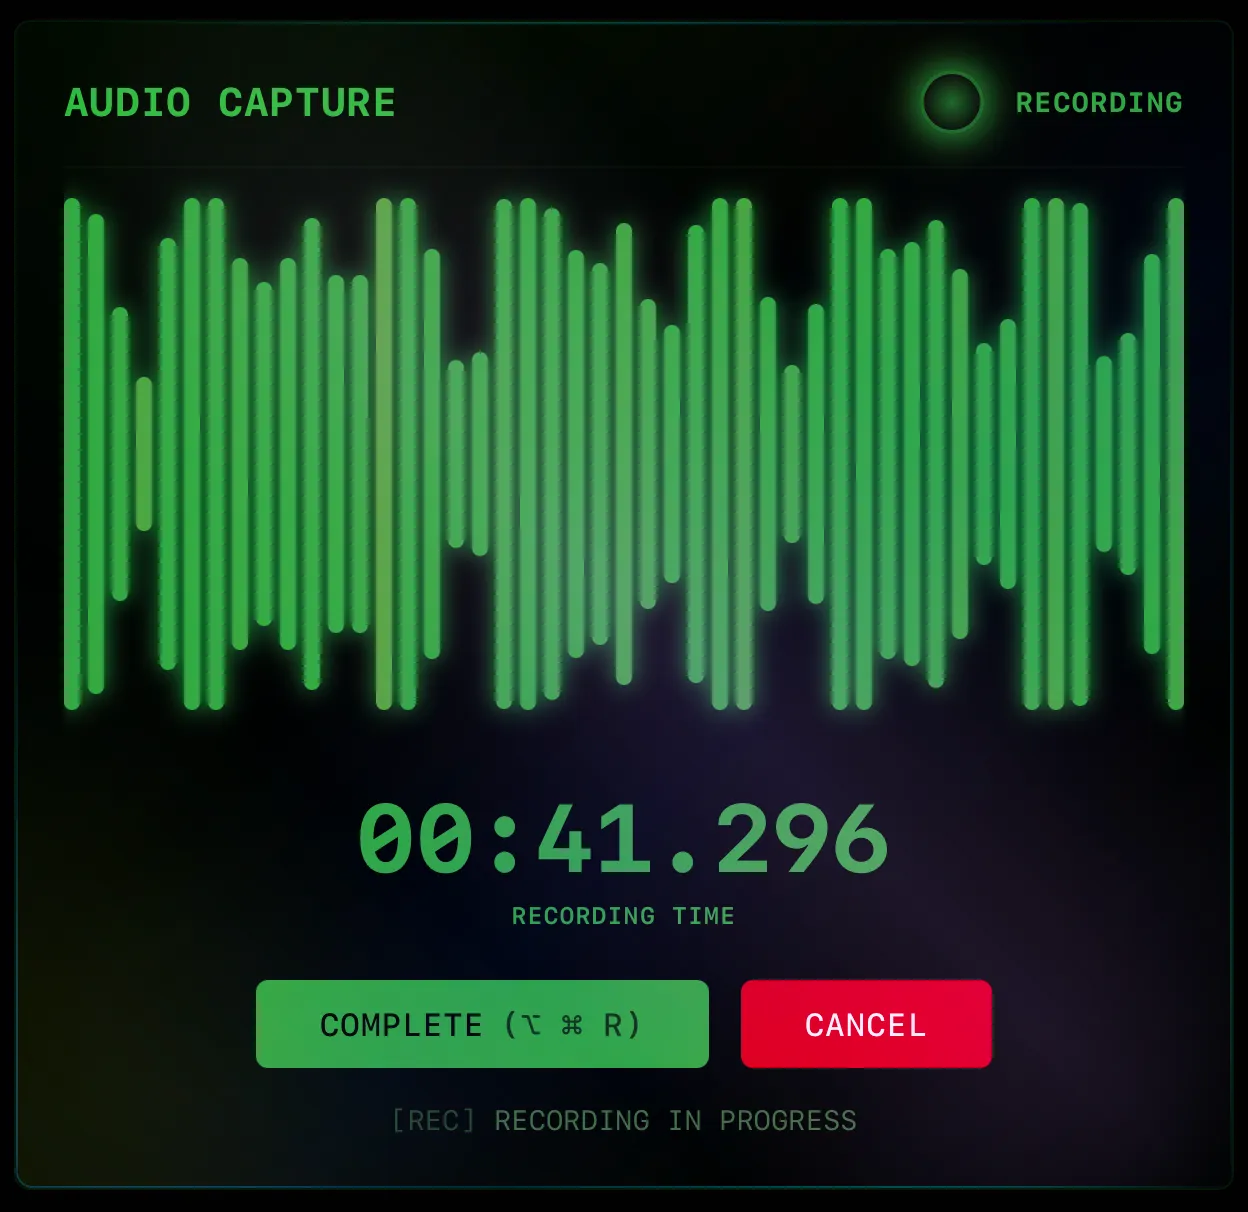
Signal monitoring: The visualizer helps diagnose audio issues. If the signal is too quiet or too loud, adjust your microphone settings.
Troubleshooting: If you see no signal activity, check your system's microphone settings and ensure the correct input device is selected.
During Recording
While recording, you'll see a timer and two buttons:
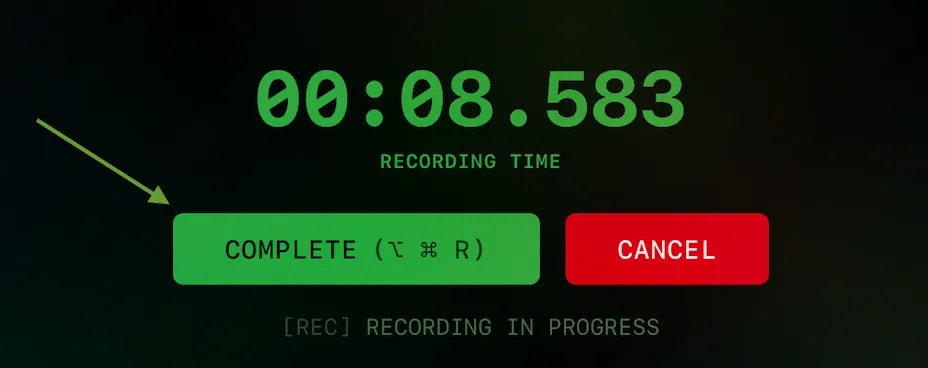
- COMPLETE (⌥ ⌘ R) - Finish recording and start transcription
- CANCEL - Discard the recording
Work while recording: Switch to other apps, browse files, or continue your workflow. When done speaking, stop recording with the hotkey from any application.
Notifications: You'll receive a notification when transcription is ready. Make sure notifications are enabled for the app.
Transcription Result
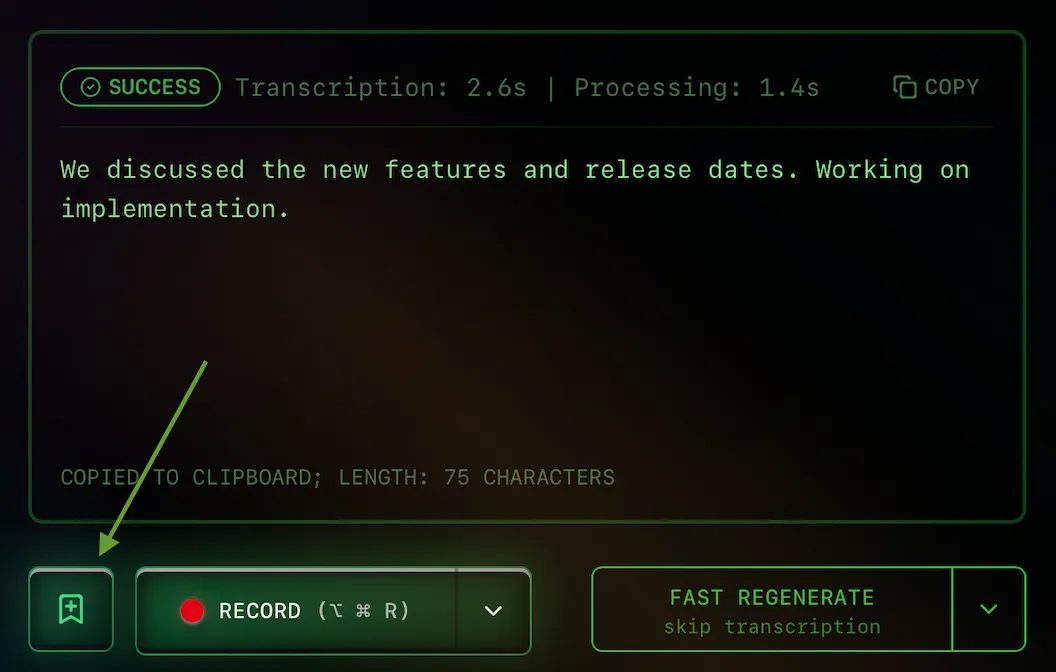
After processing, you'll see the transcription result:
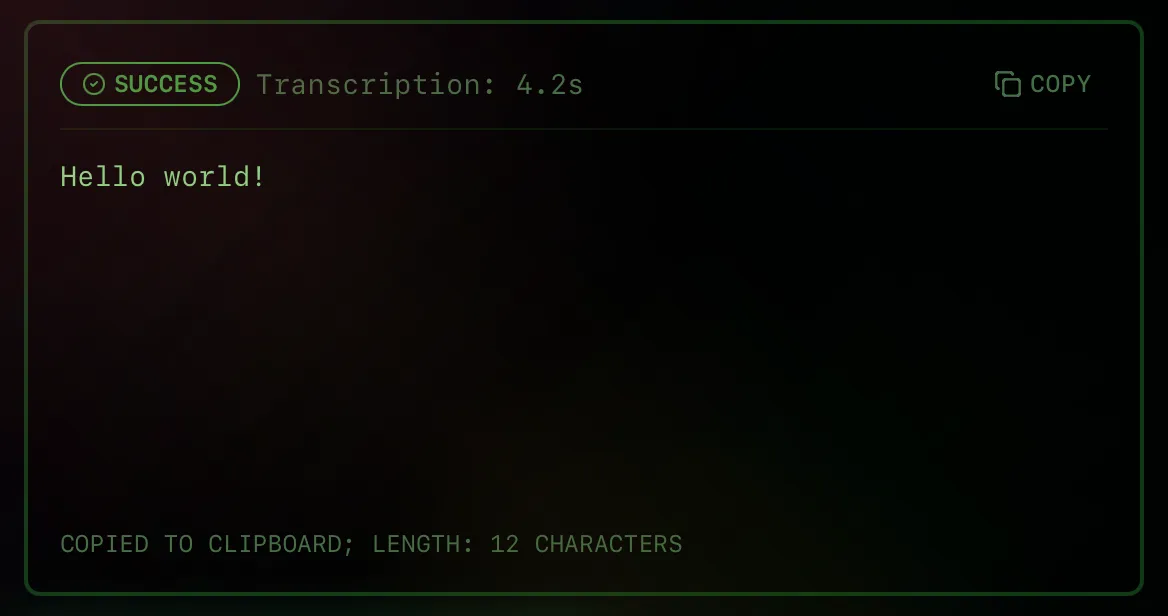
Auto-copy to clipboard: The transcribed text is automatically copied to your clipboard. Press Command + V (⌘ V) to paste it anywhere for further editing or use.
If you've installed the LLM model, you'll have access to advanced text processing options:
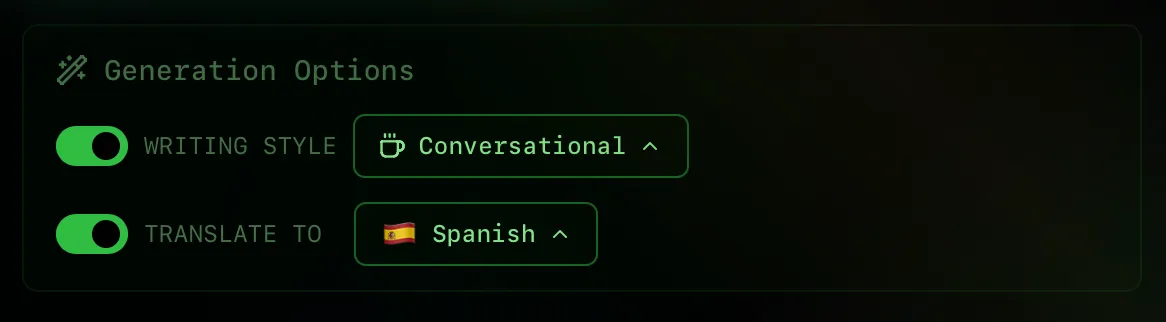
Text Styles: Choose from multiple styles to format your transcription:
- Grammar — Fix grammatical and transcription errors
- Professional — Formal business tone
- Conversational — Natural, casual style
- Concise — Brief and to the point
Translation: Select a target language to automatically translate your transcription to another language.
Quick Regeneration
Save time by regenerating results without re-recording:
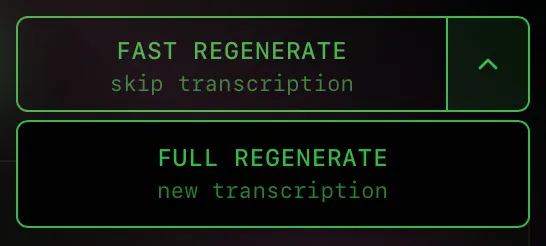
Fast Regenerate: Changed AI settings like style or translation language? Apply new settings to your existing transcription instantly—no need to record again.
Full Regenerate: If something didn't go as expected, re-process the original audio from scratch—no need to record again.
Audio/Video Files
In addition to voice recording, you can load existing audio or video files for transcription.
Loading Files
Click the dropdown menu on the RECORD button to access file loading options:
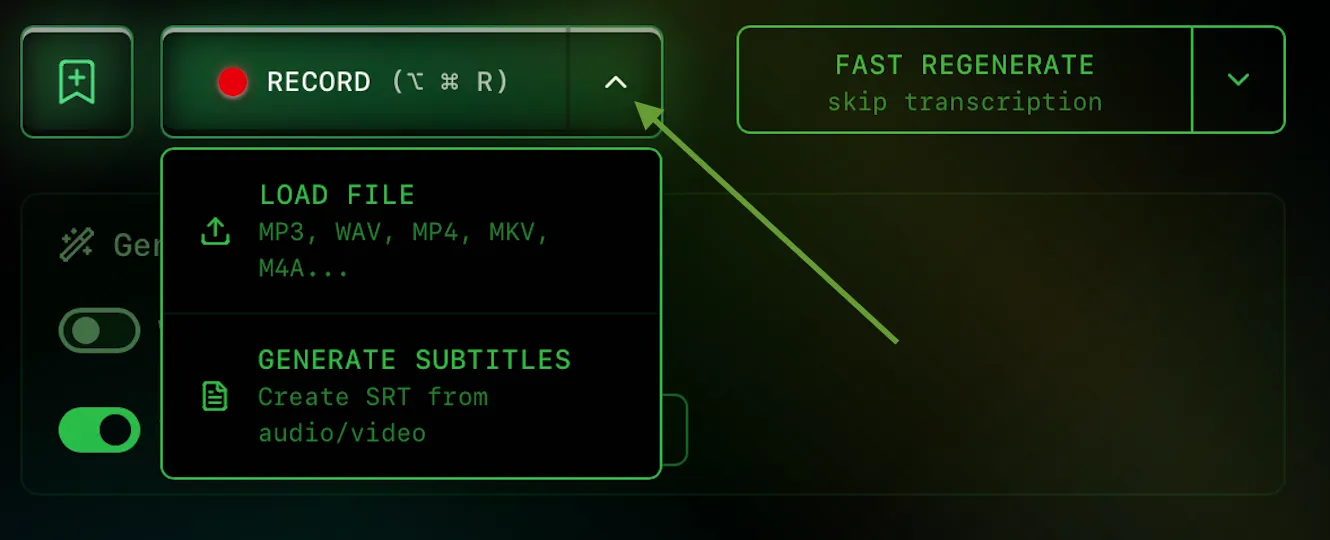
Supported Formats: MP3, WAV, MP4, MKV, M4A, and other common audio/video formats.
Available Options
When loading a file, you can choose between two transcription modes:
- LOAD FILE — Transcribe the file as regular text, just like with voice recording. The result is a continuous text transcript.
- GENERATE SUBTITLES — Create an SRT subtitle file with timestamps. This format includes timing information for each subtitle segment, making it perfect for video subtitles.
Combined with AI Features: All text processing features work with file transcription too:
- Text Styles — Apply grammar correction, professional tone, conversational style, or concise formatting
- Translation — Automatically translate transcriptions to other languages
- Both modes — Use styles and translation together for maximum flexibility
Note: Processing large audio or video files may take some time, especially when combining transcription with translation and text styling.
Use Cases
- Meeting recordings — Transcribe recorded meetings or interviews
- Video subtitles — Generate accurate subtitles for your videos with timestamps
- Podcast transcripts — Convert podcast episodes to text for accessibility or SEO
- Multilingual content — Transcribe and translate content in one step
Journal
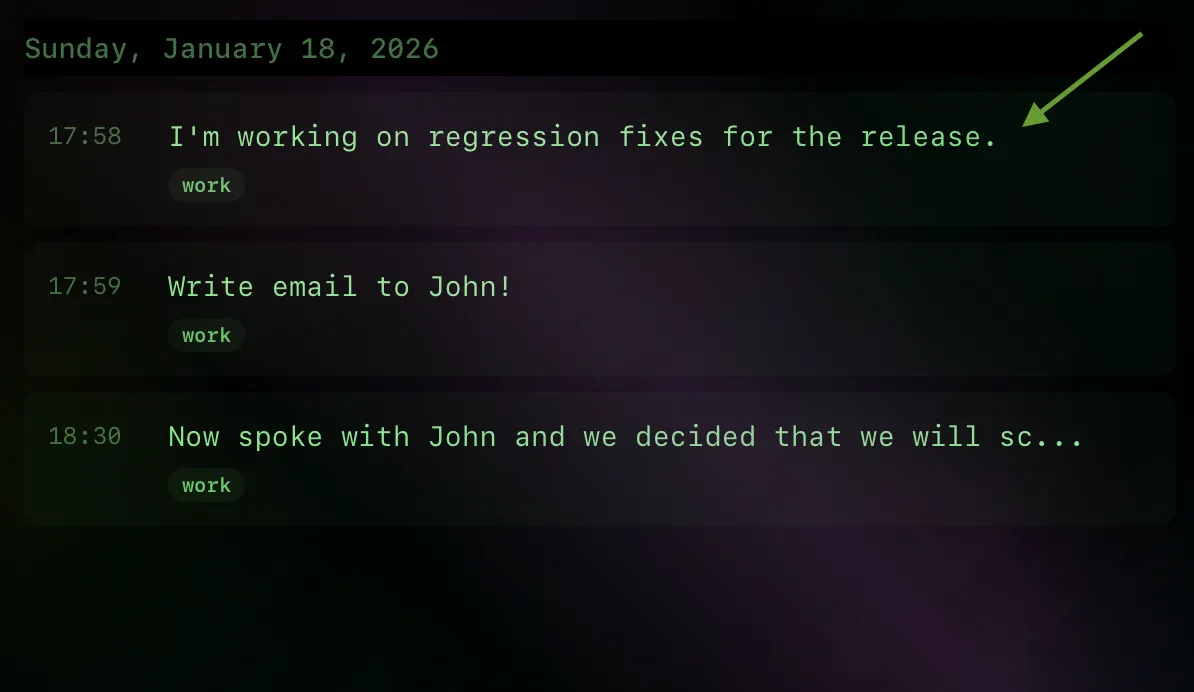
Save your transcriptions for later reference. Organize them with tags, search through your notes, and export filtered results.
Mental Model: Journal looks backwards in time to show notes you've already created. When you select current "Week", you see notes created from today going back 7 days — it's your history.
Switching to Journal
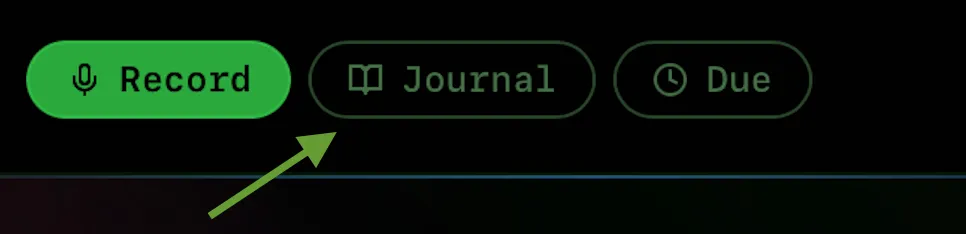
The app has two main tabs: Record and Journal. Click the Journal tab to access your saved notes:
Two modes: Use the Record tab for transcription, and the Journal tab to manage your saved notes. You can switch between them at any time.
Saving a Note
After transcription, click the bookmark button to save the result to your journal:
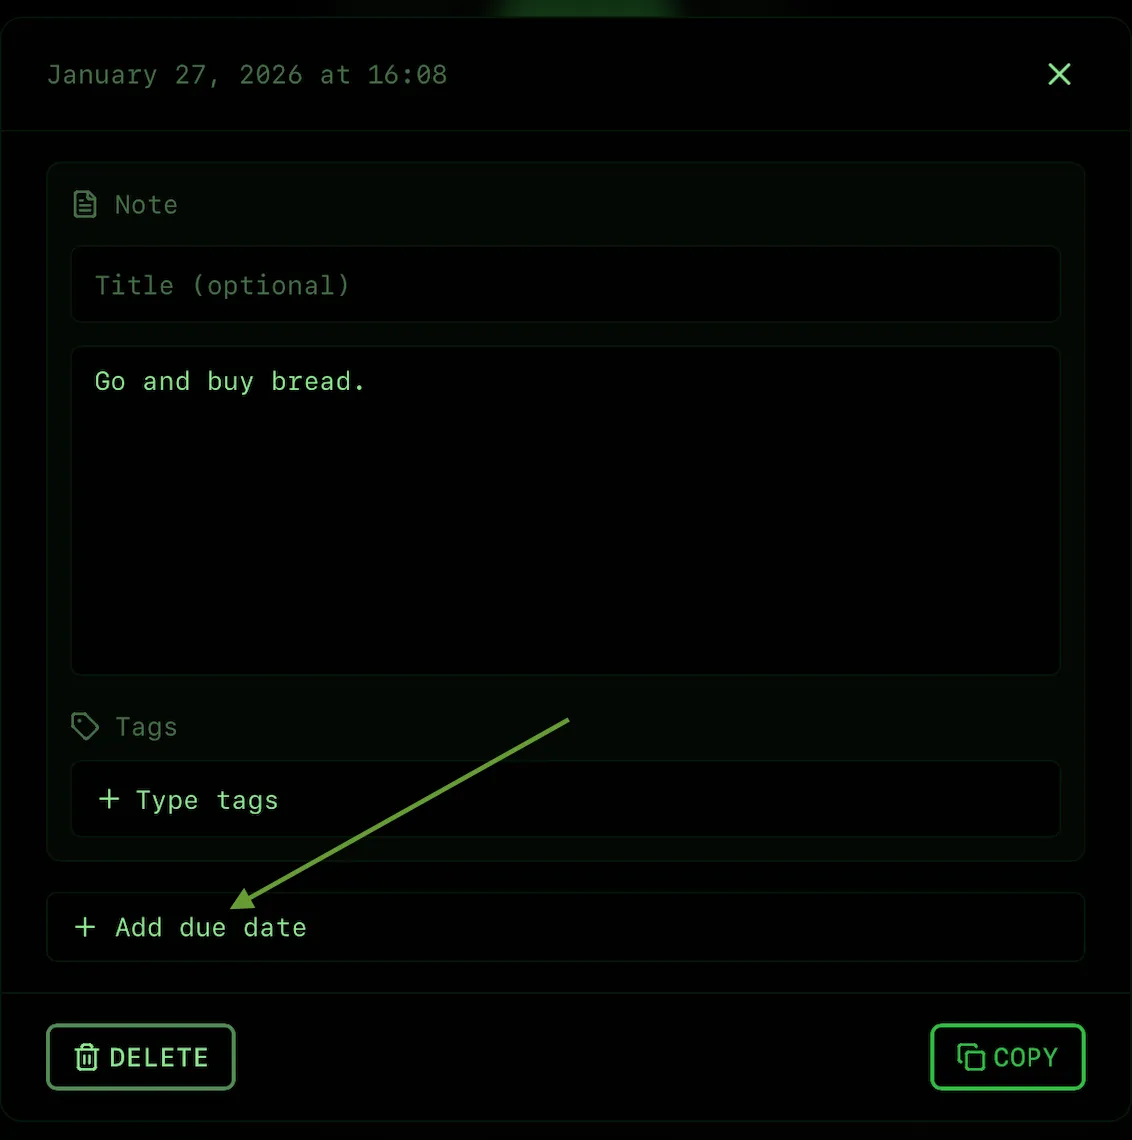
A modal will appear where you can add optional details before saving:
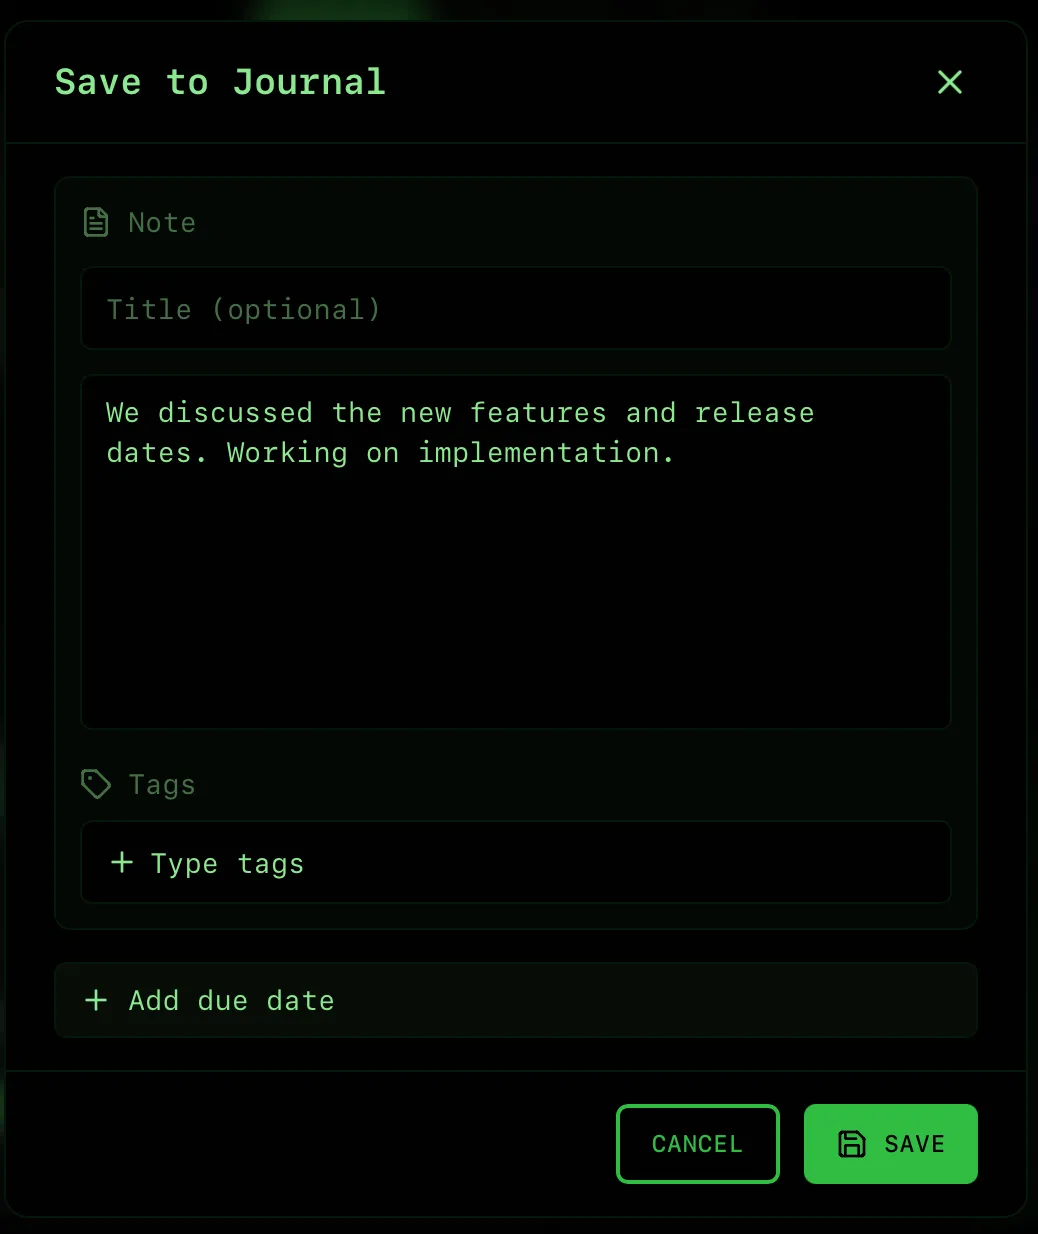
Modal Fields:
- Title — Optional custom title. If left empty, the first words of your note will be used as the preview.
- Content — The transcribed text is automatically filled here. You can edit it before saving if needed.
- Tags — Add tags to organize your notes. Start typing to create a new tag or select from existing ones. Multiple tags can be added. Tags make it easy to filter and find related notes later.
- Due Date — Set a deadline to track this note on the Due Board. Once you add a due date, the note becomes trackable with additional options: set reminders (get notifications before the deadline), make it recurring (daily, weekly, monthly, or custom intervals), and mark instances as complete when done. Perfect for habits, recurring tasks, and deadline-driven goals.
Tip: You don't need to fill all fields. The only required element is the content, which is already there from your transcription. Click "Save" when ready or "Cancel" to discard.
Editing Saved Notes
After saving, the bookmark button becomes highlighted. Click it to view or edit your saved note:

Quick access: The highlighted button indicates the note is saved. Click to open it for viewing, editing the title/content, managing tags, or deleting the note.
Browsing Your Journal
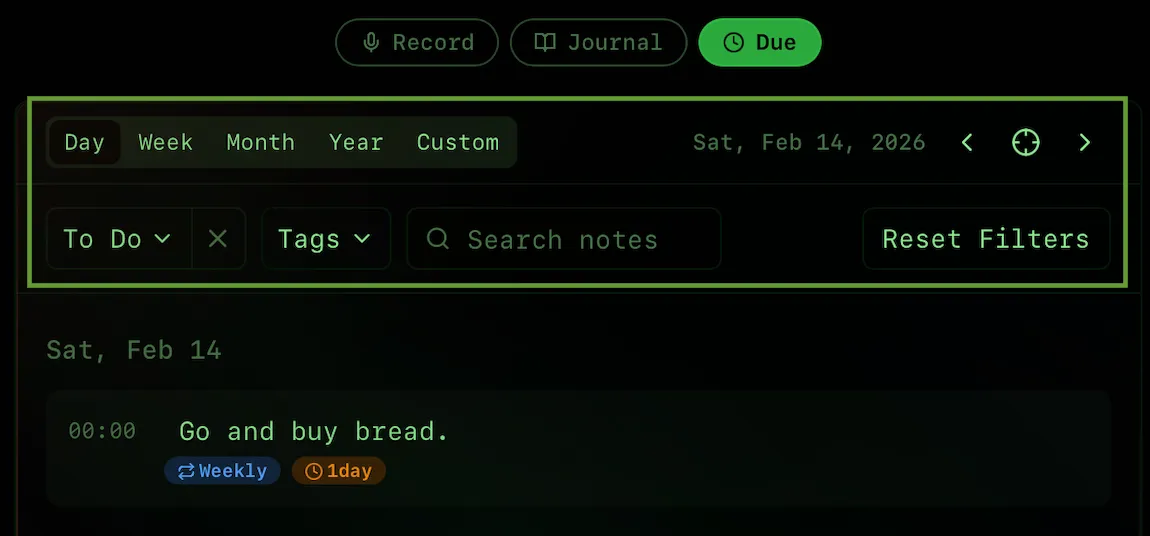
In the Journal tab, browse your notes by day, week, month, or year. Use the navigation arrows to move between periods:

- Period selector — Choose Day, Week, Month, Year, or Custom date range
- Search — Find notes by text content (partial matching supported)
- Tags filter — Filter notes by one or more tags
- Navigation arrows — Move to previous/next period
Time Periods:
- Day — Today only
- Week — Today and 6 days back (7 days total)
- Month — Today and 29 days back (30 days total)
- Year — Today and 364 days back (365 days total)
- Custom — Specify exact start and end dates
Viewing and Editing Notes
Click on any note in the list to open it for viewing or editing:
Edit mode: In the note detail view, you can edit the title, content, and tags.
Delete: Remove notes you no longer need from the detail view.
Exporting Notes
Copy filtered notes to your clipboard for use in other apps:
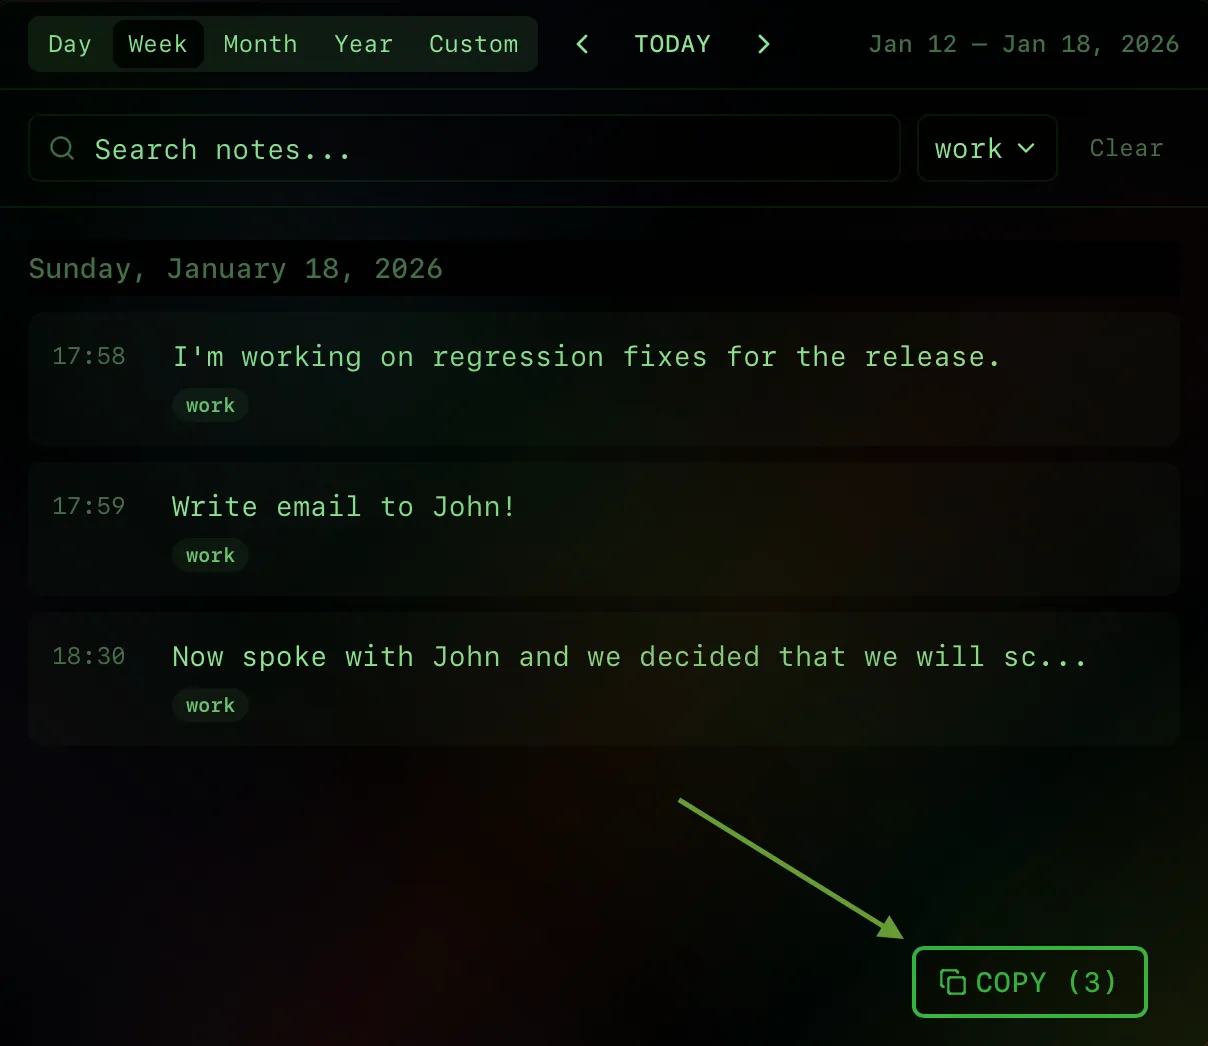
Export format: Notes are copied as formatted text including the date, title, content, and tags for each note. Perfect for pasting into documents, emails, or other apps.
Due (Task Management)
Turn your notes into tasks with deadlines, reminders, and recurring schedules. Stay on top of what needs to be done.
Mental Model: Due tab looks forward in time to show upcoming tasks and deadlines. When you select "Week", you see tasks due from today going forward 7 days — it's your future to-do list.
Understanding Due vs Journal
The key difference between Journal and Due tabs:
| Feature | Journal Tab | Due Tab |
|---|---|---|
| Time Direction | Backward (past) | Forward (future) |
| Week Period | Today + past 6 days | Today + next 6 days |
| Use Case | What was recorded | What needs to be done |
| Example | Notes created Jan 21-27 | Tasks due Jan 27 - Feb 2 |
Accessing the Due Tab
Click the Due tab to see your tasks with deadlines:

Three main tabs: Record for voice transcription, Journal for reviewing your notes, and Due for managing tasks with deadlines.
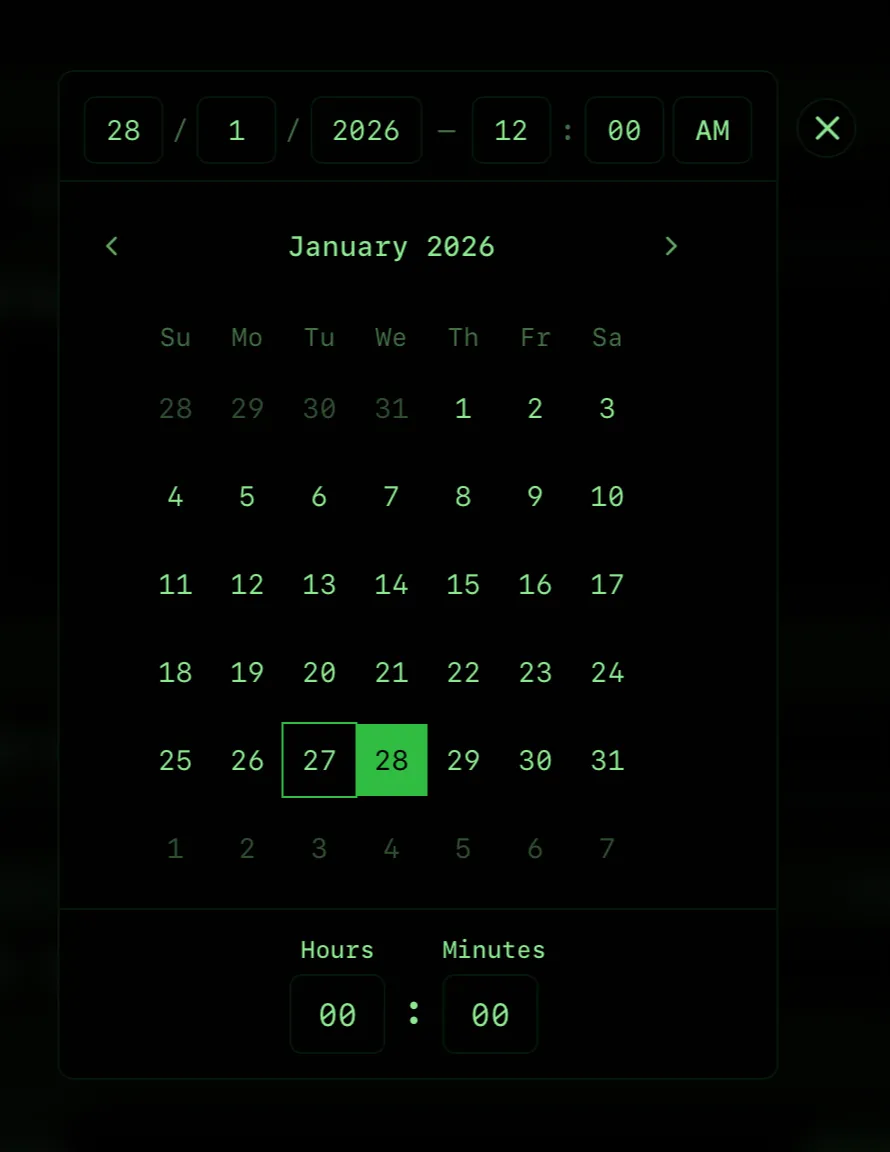
Adding a Due Date to a Note
From any note in the Journal, you can add a due date to turn it into a task:
Click "Add Due Date" and select when the task is due:
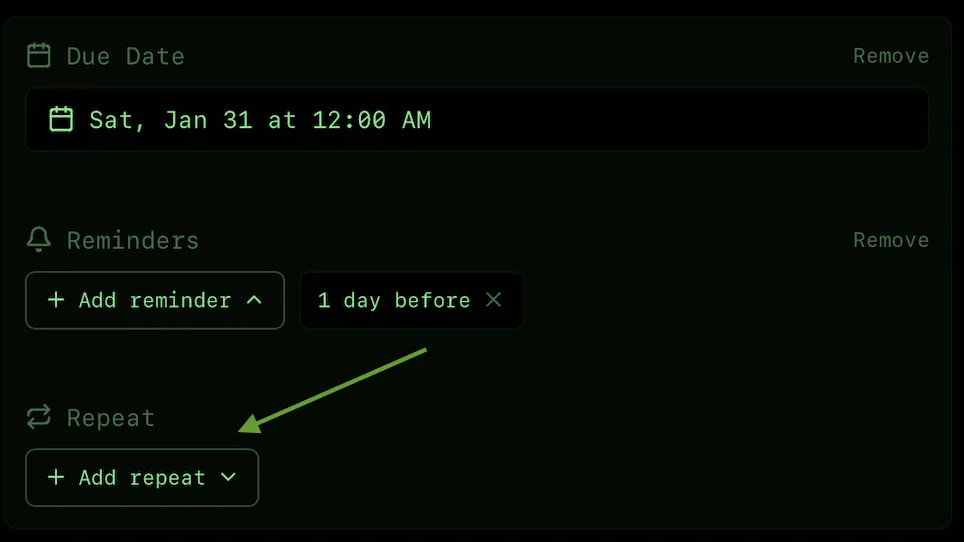
Setting Up Reminders
Never miss a deadline by adding reminders to your tasks:
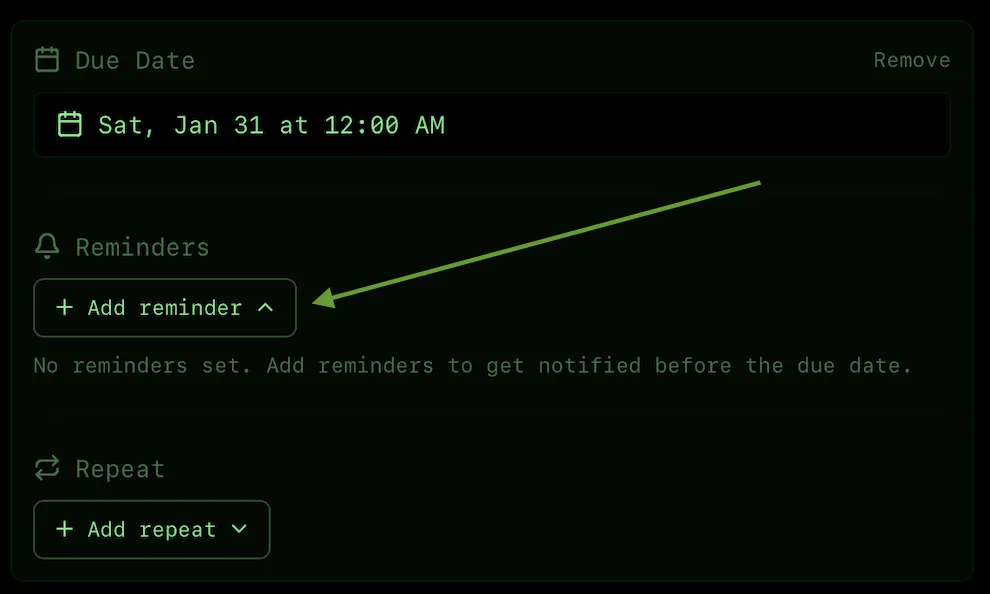
Reminder options:
- When due (at the exact time)
- 5, 15, or 30 minutes before
- 1 hour or 2 hours before
- 1 day, 2 days, or 1 week before
Multiple reminders: Add several reminders to the same task. For example, set one reminder 1 day before and another 1 hour before for important tasks.
Creating Recurring Tasks
The repeat system works just like Google Calendar. Create tasks that repeat automatically:
Repeat types:
- Daily — Every day, every 2 days, every 3 days, etc.
- Weekly — Every week, every 2 weeks, etc.
- Monthly — Every month, every 2 months, etc.
- Yearly — Every year
- Custom — Any combination you need
Control when recurring tasks stop:
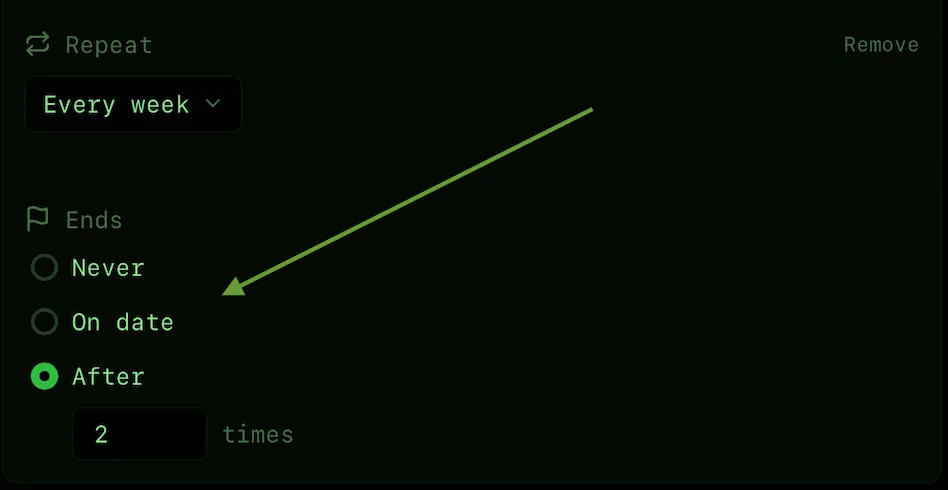
End options:
- Never — Repeats indefinitely
- End Date — Stop repeating after a specific date
- Max Occurrences — Stop after a certain number of times
Examples: "Daily standup at 9 AM", "Weekly grocery shopping on Sunday", "Monthly bills on the 1st", "Yearly car insurance renewal".
Viewing and Completing Tasks
See all your upcoming tasks organized by due date:
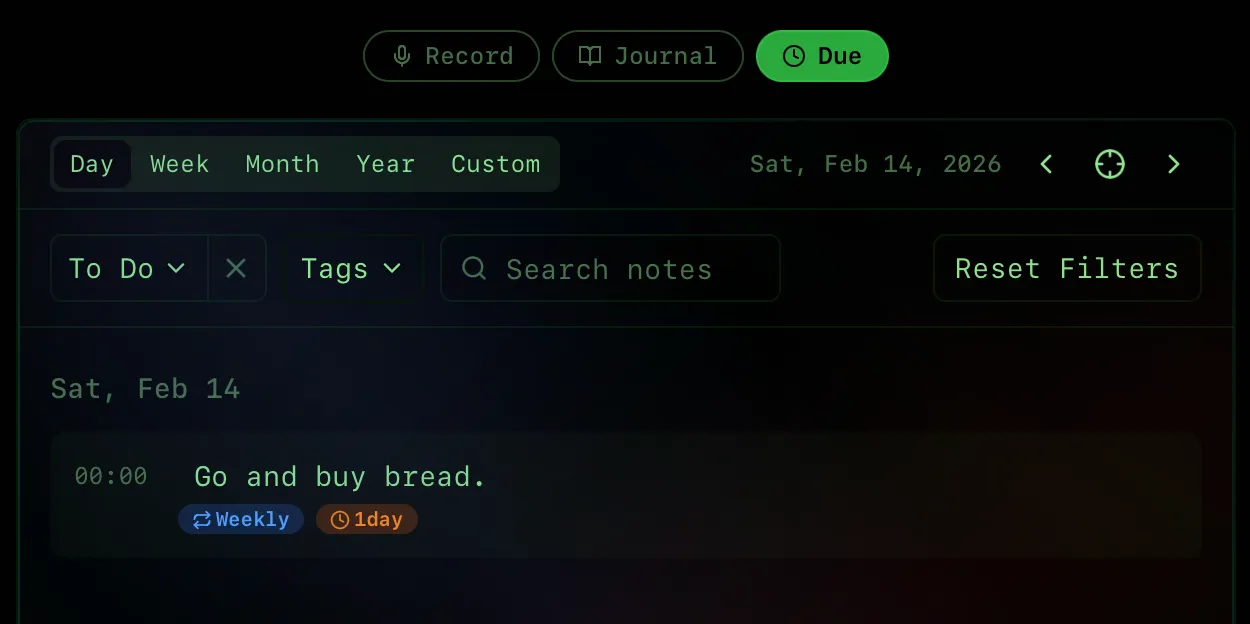
Task completion: Hover over any task to reveal a checkbox. Click to mark it complete. Completed tasks show with strikethrough text but remain visible so you can see what you've accomplished.
Recurring tasks: When you complete one instance of a recurring task, it doesn't affect future instances. Each appears independently in your Due list.
Filtering Your Tasks
Find exactly what you need with powerful filters:
- Period selector — Choose Day, Week, Month, Year, or Custom date range
- Status filter — Show All, To Do, or Done tasks
- Tags filter — Filter by one or more tags
- Search — Find tasks by text content
- Navigation arrows — Move to previous/next period
Time Periods (looking forward):
- Day — Today only
- Week — Today and 6 days ahead (7 days total)
- Month — Today and 29 days ahead (30 days total)
- Year — Today and 364 days ahead (365 days total)
- Custom — Specify exact start and end dates
Focus mode: Use "To Do" status filter to hide completed tasks and focus on what still needs attention.
Tips for Using Due Tab
Daily Workflow:
- Start your day by checking "Day" view with "To Do" filter
- Check off tasks as you complete them
- Use "Week" view every Sunday to plan your week
Pro Tips:
- Create tags like "work", "personal", "urgent" for easy filtering
- Stack reminders (1 day before + 1 hour before) for important tasks
- Make recurring tasks for anything you do regularly — it saves time
- Your filter settings are automatically saved when you switch tabs
Settings
Opening Settings
Click the settings icon to open the settings modal:

Settings Modal
The settings modal provides several configuration options:
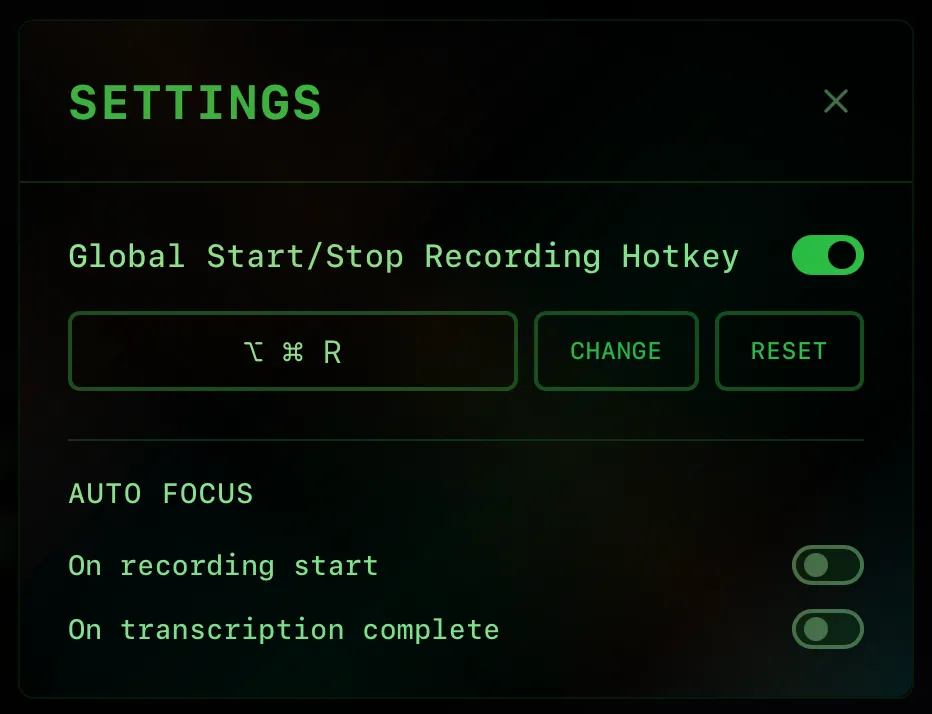
Available Settings:
- Global Start/Stop Recording Hotkey — Toggle on/off to enable or disable keyboard shortcuts. When enabled, you can:
- Change — Click to record a new hotkey combination. Press any key combination with at least one modifier (⌥ Option, ⌃ Control, ⌘ Command, or ⇧ Shift) and a letter key.
- Reset — Restore the default hotkey (⌘⇧Space).
- Auto Focus — Control when the app window automatically comes to the foreground:
- On recording start — Automatically focus the app window when you start recording via hotkey.
- On transcription complete — Automatically focus the app window when transcription finishes, so you can immediately see and interact with the result.
Tip: If you prefer to work without hotkeys and use only mouse clicks, simply toggle off the Global Hotkey option.